 If you are a beer lover who has been interested in brewing your own beer but the process seems intimidating, this guide is for you. Brewing your own craft beer in your kitchen just takes an understanding of the ingredients, the equipment, and the process. Brewing your own craft beer is an art, and a lot of fun for anyone interested in becoming a craft brewer. RainMakers Supply is here to help you go from beginner to advanced, offering all the equipment and know-how you need with a fully stocked brew store in the Chicagoland area and local experts with craft brewing tips and recipes.
Read more for the most important tips on homebrewing for beginners, such as the basic ingredients including the importance of yeast, equipment choices in brew kettles and wort chillers and more on the fermentation process.
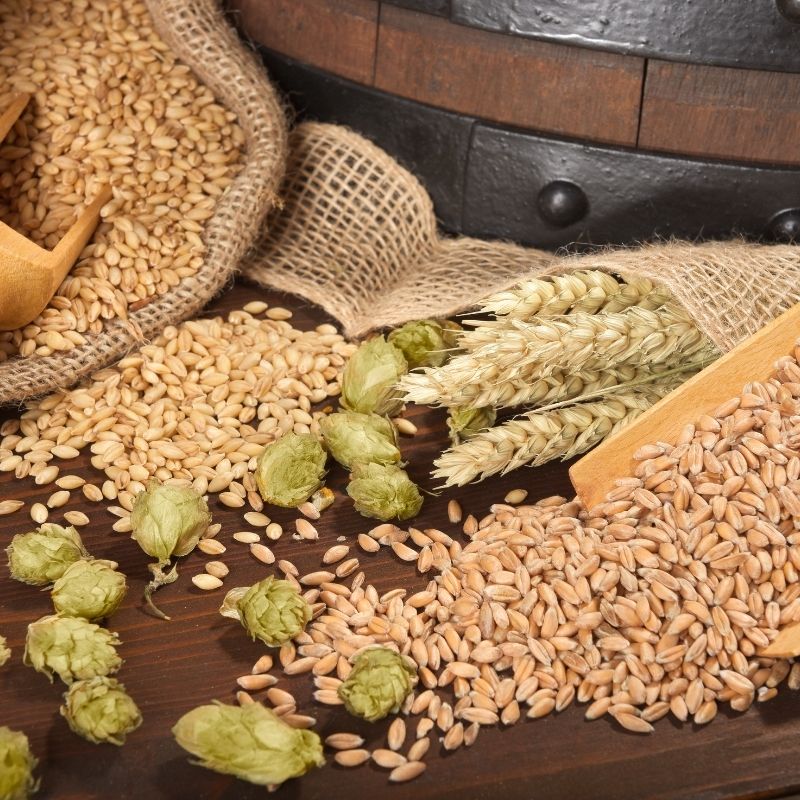
Home Brewing Ingredients
The four basic ingredients for brewing your own beer are water, barley, hops, and yeast. Any good beer lover is aware of Oktoberfest in Germany and those famous German ales, but did you know there used to be a Beer Purity Law in Germany back in the 16th century which declared that the only ingredients that could be used in making beer were water, barley, and hops? Although yeast was definitely an important part of the process, brewers would use sediments from previous batches which contained yeast or they would let it sit until wild yeast took over. It wasn’t until the 1800s when Louis Pasteur discovered the important role of yeast in fermentation.
Water
Water makes up 90 to 96% of any beer recipe which means you want to make sure that your water at least tastes good. Most municipal water supplies in North America produce tapwater which would work just fine, although if your water has a chlorine taste or is known to have large amounts of bicarbonates, sulfur or iron you may want to use bottled water. Some advanced brewers find ways to alter the water by adding minerals or sourcing spring water for your own unique taste.
Barley
Barley brings most of our fermentable sugars. Barley looks like wheat but has been processed to malted barley for making beer. You might use around 2 pounds of malted barley or grains for most 1 gallon recipes. Barley has to be milled or crushed, so local homebrew stores will mill your grains or sell them pre-milled. You could place your grains in a Ziploc bag and crush them with a rolling pin although it is recommended to get your grains milled if possible.
Hops
Hops might be the favorite ingredient for many craft beer enthusiasts, it is an impressive plant when growing wild and can even grow to heights of 18 feet. Hops act to balance out the sweetness of the malt and add some bitterness and maybe a floral flavor to your beer. Hops also provide the benefit of preventing spoilage.
Yeast
There is a lot that can be said about yeast, although the most important thing about yeast is that you cannot make beer without it. Yeast is a living microorganism that loves sugar and converts the sugars into alcohol and CO2. Many varieties of yeast are available for making beer and can be categorized as either ale or lager yeasts. Ale yeasts ferment at close to room temperature while lager yeasts ferment at colder temperatures.
Talk to the Brewmasters at RainMakers Supply for some favorite recipes and how to get the flavor you desire.
Home Brewing Equipment
The most essential equipment needed to brew your own beer at home includes a brew kettle, a wort chiller, carboys, fermenting equipment, auto-siphon, bottles, cappers, and thermometers. RainMakers Supply has all the essentials and vintage bottles, hoses, tubing hydrometers, kegerators and more. We also offer a handy Brew Your Own kit to help the beginning home brewer get started.
Some tips when starting home brewing for beginners is to consider going with a larger brew kettle initially even if you plan to start with smaller batches. This will help to prevent boil overs and will set you up for more advanced all grain brewing without making a mess on your stove. Some home brewers might still be chilling their wort in an ice bath, this can get costly depending on how much ice you need and may not be a sure bet in chilling your wort quickly enough to ward off bacteria. A nice wort chiller is worth the investment in time, hassle, and quality beer. A larger siphon might be worth the investment in time savings when transferring your precious liquid from vessel to vessel.
Home Brewing Process
Now that you have your favorite ingredients and homebrewing equipment, the fun starts with making our own beer at home. The beer making process combines these ingredients in a way that allows yeast to ferment our bittersweet liquid into a bubbly alcoholic drink. The basic home brewing process includes:
- Mashing – converting malted barley into sugars is called mashing and is done by soaking them in a hot water bath.
- Boiling – next we remove the grains from the water and boil the sweet liquid adding our bittering hops and usually boiling for an hour. Some recipes call for adding hops throughout the boil or towards the end. When the boiling is complete, you’ve made wort! (The name may not sound appealing but it sure brings a feeling of accomplishment to the home brewer).
- Chilling – chilling your wort to what we call the “pitching” temperature is a very important part of the process. We need to cool the liquid quickly to get to the right temperature for adding the yeast, within 30 minutes or less to avoid contamination. This is where a wort chiller comes in handy.
- Pitching Yeast – adding the yeast, or “pitching” the yeast is done with wort at the right temperature and then transferred to a fermenting vessel like a glass carboy. Seal the carboy and store in a dark, dry, and cool spot and have some patience to let mother nature take over which can take a couple of weeks.
- Bottling – your beer should be ready for bottling after two weeks which is how long it takes for the yeast to consume all the sugars and convert your wort into beer. Transferring your flat beer into bottles with a small dose of sugar will allow residual yeast to eat up the sugars and carbonate your beer. This will take another couple of weeks so you’ll want to wait at least two weeks or even thirty days before cracking your first cold one.
Sanitation is key throughout the entire home brew process, ask RainMakers for the best sanitation products and how to prevent contamination.
RainMakers Supply offers a team of experts to help you in choosing the right home brewing equipment and brewing supplies. We guide you with additional features, recipes, ingredients, and direction to go from beginner to advanced home brewer. Contact us to learn more and for any questions on home brewing for beginners.